


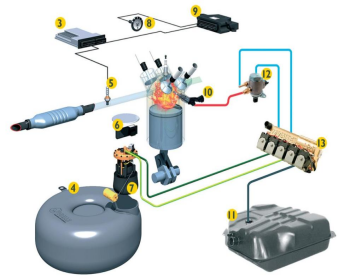
The installation of CNG conversion kit involves multiple key components and step
1. Preparation before installation
(1) Vehicle inspection: Ensure that the engine power performance of the vehicle is good, the compression pressure of each cylinder meets the original design, the frame is not deformed or corroded, and the service life is more than two years away from the national scrap life.
(2) Component acceptance: Check whether all components of the CNG conversion kit (such as gas cylinders, pressure reducers, high-pressure pipelines, conversion switches, etc.) are complete, whether there are product certificates and inspection reports, and ensure that the component specifications match the vehicle model.
2. Installation of main components
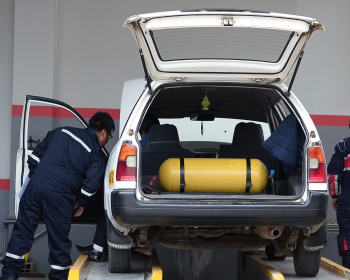
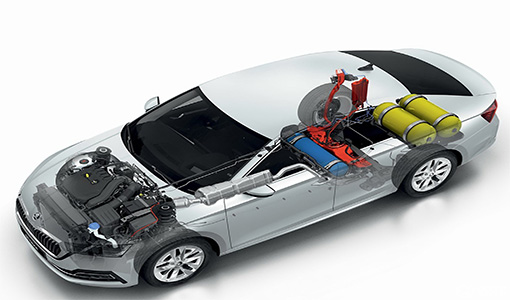
(1) Gas cylinder installation:
1) Choose safe parts of the vehicle to install gas cylinders, such as beside the frame, on the auxiliary longitudinal beam, or between the cab and the trunk, without affecting the vehicle's driving performance.
2) Rubber pads should be placed between the gas cylinder and the fixing clip, and installed firmly. After tightening, a force of 8 times the weight of the gas cylinder should be applied along the longitudinal direction of the vehicle without displacement or loosening.
3) The distance between the gas cylinder and the exhaust pipe shall not be less than 200mm, and the distance from the transmission shaft shall not be less than 75mm.
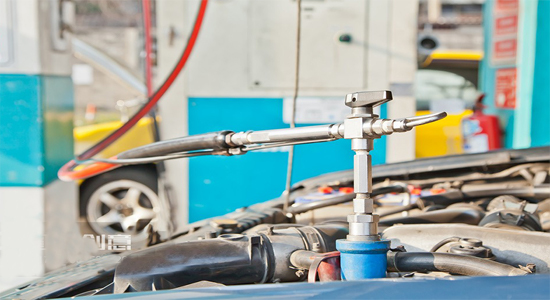
(2) High pressure pipeline installation:
1) The high-pressure pipeline is made of stainless steel seamless steel pipe, with a burst pressure of not less than 70MPa, connected using sleeve type joints, and meets the quality requirements of GB3765.
2) The pipeline should be arranged neatly, with a fixed spacing of no more than 600mm. When in contact with adjacent components or passing through plate holes, rubber pads should be used for protection. The distance from the engine exhaust pipe should not be less than 75mm, and insulation devices should be installed when the distance is between 75-200mm.
3) Pressure reducer installation:
4) Installed in a location with low vibration, such as the front panel of the cab or near the engine, away from exhaust pipes and heat sources, with the diaphragm perpendicular to the ground.
5) Connect the engine circulating water heating device to ensure that the water connection does not leak and that the circulating water can be drained in a timely manner.
6) Conversion switch and instrument installation:
7) Install a fuel switch in a convenient location for operation and observation inside the cab. The switch should have clear markings and be able to control the three states of fuel supply, gas supply, and full oil and gas shut-off.
8) Install pressure gauges, gas volume displays, and other instruments. The range of the pressure gauge should be 1.5-2 times the nominal pressure, and the gas volume display should be installed in a location that is easy for the driver to observe.
3. Electrical system installation
Connect all electrical circuits according to the circuit diagram, pay attention to the good grounding of electrical components, use plug connectors for wire joints, and ensure that the performance meets QCN-29009 regulations. The circuit should be securely fastened and not rub against adjacent components.
Install an ignition time converter to automatically adjust the ignition advance angle according to the fuel type.
(1) Post installation inspection and debugging
1) Sealing test: At a rated working pressure of 20MPa, use a leak detector to inspect the entire gas supply system to ensure no air leakage.
2) Function debugging: Start the engine and run it with gasoline and natural gas respectively. Check whether the fuel conversion is smooth, whether the engine idle and acceleration performance are normal, and whether the oil and gas conversion switch operation is flexible.
3) Safety testing: Check the fixing condition of components such as gas cylinders, high-pressure pipelines, and pressure reducers to ensure that they do not loosen or fall off due to vibration or bumps during vehicle operation.
4. Attention:
1) The installation of CNG conversion kits must be carried out by qualified professional modification factories, and the installation process must comply with relevant national and local technical standards.
2) After installation, the vehicle must pass inspection and obtain a modification certificate before it can be driven on the road.
3) Users need to regularly maintain the CNG system, check the fastening of components such as gas cylinders, pipelines, and pressure reducers to ensure the safe operation of the system.
Refer to:https://carinterior.alibaba.com/buyingguides/lpg-gas-kit-buyer%E2%80%99s-guide-types,-fit-pitfallsThe pictures and articles are from the internet. If there is any infringement, please contact us to delete them.
Popular articles
-
How the CNG Automotive S
Compressed natural gas (CNG) automotive systems
-
Advantages Of CNG Gas V
Compressed natural gas vehicles are vehicles th
-
What Is CNG Pressure Red
The pressure reducer of natural gas vehicle is
-
Reasons For High Gas Con
1. Original vehicle condition A. The tec
-
Differences Between Sing
Characteristics of Gas Single Point Device
-

How To Improve The Power
1. Install ignition advance angle What i
-

How The CNG Gas Vehicle
If you want to know �C how does the CNG conversi
-
Advantages And Principle
LPG and CNG are two mainstream alternati


Latest comments
0piece comment
no comments, welcome to comment��